
ORACLE 11g Installation for Windows Step By Step Process
STEPS
TO INSTALL ORACLE ON YOUR WINDOWS MACHINE
Step 1: Creating an OTN Account
Step 2: Downloading Oracle 11g
Step 3: Unzipping Oracle
Step 4: Installing and Configuring Oracle
Step
1: Creating an OTN Account
To
download you first have to register to Oracle Website and steps are given below
how it s is mentioned.
To
create your own Oracle Technology Network (OTN) account.
Go
to http://www.oracle.com
Or
Directly
Go to http://www.oracle.com/technology
You
will see this screen
In
above screen

In above screen You can see Oracle Database 11g release 2. Please click on it.
Next Screen will appear and Click there to register for oracle account.

And after completion of your registration process you can download the required version according to your Platform by accepting the license agreement.
Step 2: Downloading Oracle 11g Release 2
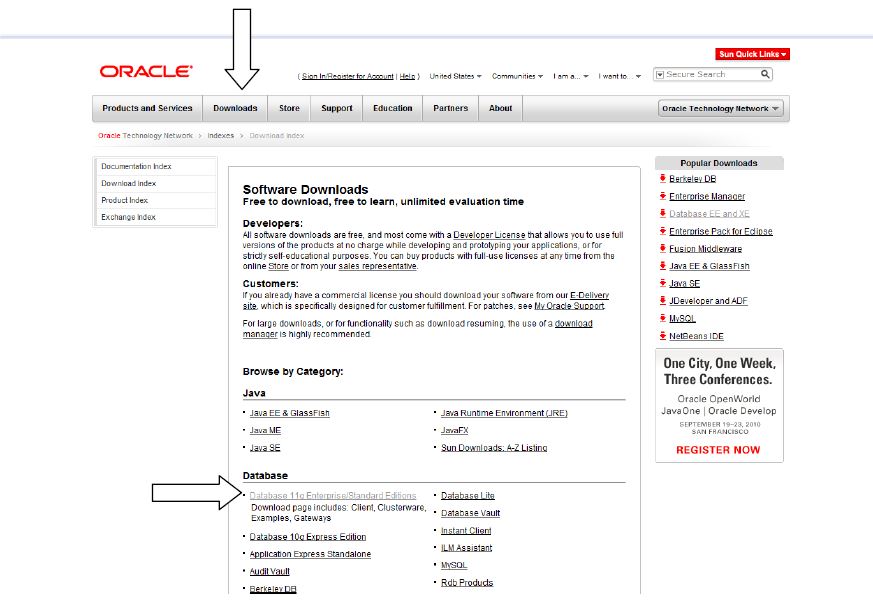
Go to this Link http://www.oracle.com/technology/index.html
After reaching this link click there on download tab. This screen will appear and after that click on Database Enterprise/standard edition 11g.
Save the Database file on your disk. And after saving both the files on your disk and we have to UNZIP the files.

Click Here on Setup Files to Start Installing Oracle on your system.
Step 4: Installing and Configuring Oracle
To install Oracle 11g on any Windows Platform You have to follow the following steps. The only catch was that the Oracle 11g (11.1.0.7) installer validates only against Windows 5.0, 5.1, 5.2 or 6.0. Windows 7 is actually Windows Code Base 6.1, as seen in this screen shot after successful installation:
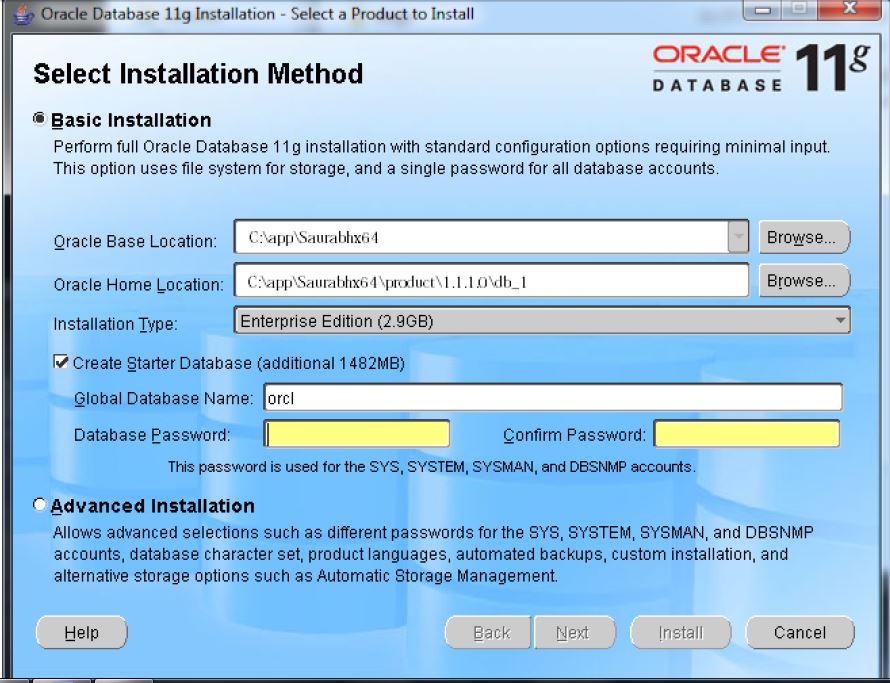
1. Click on the setup icon to launch the installer. You should then see the following screen shot. Enter a password for the SYS and SYSTEM users (if you’re coming to Oracle from a MySQL background they’re like the root user in MySQL). When you’ve entered a matching password in both fields, the Install button becomes active. Click the Install button to proceed. Once Set up Start.
You need to enter your email id. if you require updated from Oracle
2. In this screen, you’re prompted for your Email and MetaLink Password. If this is a test database (a throw away instance without any real data), you can uncheck the box for automatic security updates. You should enter a password even for test databases. Click the Next button to proceed.

Select Configure and Database Option (First Option) Press Next Button Select Desktop class Option Press Next.
This Will be the next window appear on your screen
3. You’ll only see this failure if you’re installing Oracle 11g (11.1.0.7) on a Windows 7 operating system, which is actually version 6.1 according to their code control numbering. You simply check the Checking operating system requirements … and Checking service pack requirements … to override the prerequisite checks. Another error that you may encounter is related to networking. It is a warning and occurs when you’re operating system uses DHCP to get its IP address. You really should configure the operating system with a static IP address. You can set a static IP address in Windows 7 with these instructions.

The checked boxes now say User Verified, Click the Next button to proceed.

4. At this point, you’ll get a Windows System Alert asking you to unblock the installer’s javaw.exe program. You must grant the access or forget about installing Oracle 11g. Click the Allow access button to proceed.

5. The dialog tells you what will be installed. Click the Install button to proceed.

6. This is the installation progress dialog. It’s running while the Oracle Installer lays down the operating system files for the database management system. It takes about 8 to 9 minutes, so stretch your legs if you want to take a break. When it’s 100% complete, click the Next button to continue.

7. After the installation, you’ll see the first of the Configuration Assistants, which is the Oracle Net Configuration Assistant (unfortunately, I didn’t capture that screen shot but I provided a temporary substitute until I re-install it). Provided everything happens successfully, it’ll move to the next step without your intervention.

You should receive another Windows Security Alert (aren’t we glad that I already disabled UAC). You need to click the Allow access button to let java.exe proceed with the installation.

8. This one is exactly where it belongs. It means you have approximately a 5 to 6 minute break while a sample database instance is cloned for you. The cloning process copies a sample compressed database from the installation staging area to your local operating system.

It will prompt you if you want to open any of the other scheme. You can skip this and do it later, or click Password Management to open those scheme and set passwords for them.

Click On Password Management to set UP User name and password
User name as Scott. You will find in Password Management window, please unlock it and set password as tiger.
9. The last Configuration Assistant is the Oracle Configuration Manager Configuration. It’s a short process, it configures the cloned sample database against your installation names and passwords. When it completes it enables the Next button. Click the Next button to complete the installation.

10. You’ve finally reached almost the end of the installation. Click the Exit button on this dialog to proceed to the “are you sure” dialog box.

Confirm you meant it, by clicking the Yes button on the final dialog message below.

You’ve successfully installed Oracle 11g on Windows 7.
No comments:
Post a Comment